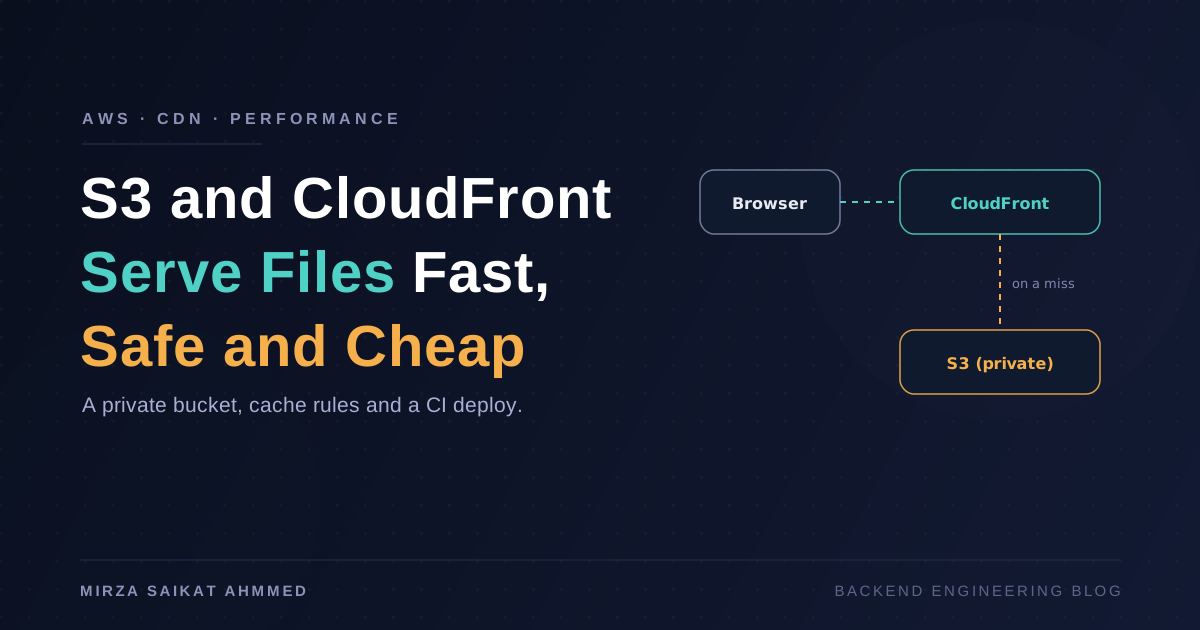
Putting images, JavaScript and videos in an S3 bucket works on day one. Then the problems arrive: visitors far from the bucket's region see slow loads, a public bucket makes security people nervous, a deploy leaves users on an old app.js, and the bill grows with every request S3 has to answer.
A CDN solves all four, and on AWS that means CloudFront in front of S3. This post walks through the full setup in the order I would build it: why a CDN helps, how one request flows, how to keep the bucket private, how to choose cache rules, how to deploy without stale files, and how to handle HTTPS, uploads and debugging. Every step has a diagram, and the last one puts everything on one page.
I describe the settings by their AWS names, so you can follow along in the console, Terraform or the CLI. Prices and limits change, so check the current AWS pricing page before you budget.
Why put a CDN in front of S3
S3 stores your files in one region. A visitor on the other side of the world pays for that distance on every request. CloudFront keeps copies of your files in edge locations around the world and answers from the closest one.
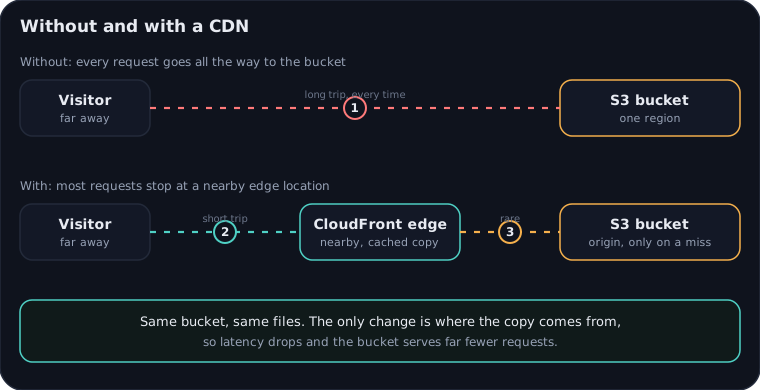
You get four things from this:
- Lower latency. The copy is nearby, so the first byte arrives sooner.
- Fewer requests to S3. A cache hit never reaches the bucket, which lowers load and request cost.
- One place for HTTPS, compression and headers. You configure them once on the distribution instead of per bucket.
- A security boundary. You can keep the bucket private and let only the CDN read it, as shown below.
The same idea is behind the cost comparison of managed services: you pay AWS to run the boring, global part so your own servers do less.
How one request flows
Before touching settings, it helps to know what actually happens when a browser asks for https://cdn.example.com/app.3f9a1c.js.
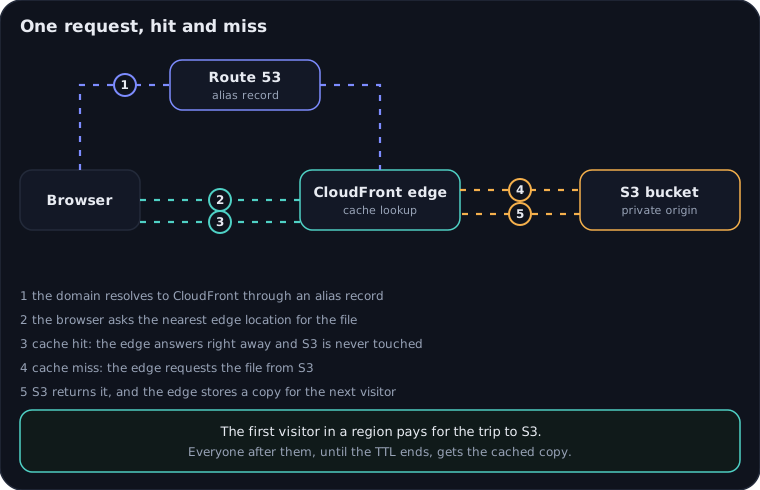
- The domain resolves to CloudFront through a Route 53 alias record.
- The browser connects to the nearest edge location and asks for the file.
- Cache hit: the edge already has a fresh copy and answers immediately. S3 is never touched.
- Cache miss: the edge requests the file from S3, your origin.
- S3 returns it, and the edge stores a copy and returns it to the browser.
The first visitor in a region pays for the trip to S3. Everyone after them, until the cache time ends, gets the cached copy. Everything else in this post is about making hits more likely and making the misses safe.
Step 1: create a private bucket
Create the S3 bucket and leave Block all public access turned on. This is the part people skip, and it is the most important one. A public bucket lets anyone bypass your CDN, your headers and your future WAF rules, and it is the classic way files leak.
Do not turn on static website hosting for this setup either. With a private bucket you point CloudFront at the normal S3 endpoint and let it read objects through AWS permissions.
Step 2: create the distribution with origin access control
Create a CloudFront distribution with your bucket as the origin and choose Origin access control (OAC). OAC makes CloudFront sign its requests to S3, so S3 can tell that a request came from your distribution and not from the internet. (OAC replaces the older origin access identity, OAI. For new setups use OAC.)
CloudFront then gives you a bucket policy to paste into the bucket. It looks like this:
{
  "Version": "2012-10-17",
  "Statement": [
    {
      "Sid": "AllowCloudFrontRead",
      "Effect": "Allow",
      "Principal": { "Service": "cloudfront.amazonaws.com" },
      "Action": "s3:GetObject",
      "Resource": "arn:aws:s3:::my-assets-bucket/*",
      "Condition": {
        "StringEquals": {
          "AWS:SourceArn": "arn:aws:cloudfront::123456789012:distribution/EDFDVBD6EXAMPLE"
        }
      }
    }
  ]
}
The condition is the important line. It says the CloudFront service may read objects, but only on behalf of this distribution. Another AWS customer's distribution cannot read your bucket, even though it is also CloudFront.
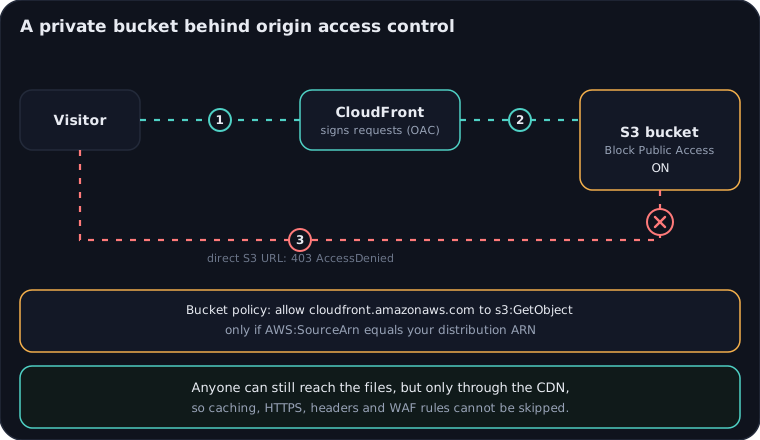
Test it: open the CloudFront URL and the file loads, then open the direct S3 URL of the same object and you get AccessDenied. That is exactly what you want.
Two small settings finish this step:
- Set a default root object of
index.html, so/serves your page. - Set Viewer protocol policy to Redirect HTTP to HTTPS.
Step 3: choose cache rules
CloudFront caches by following two things: the cache policy you attach to the behavior, and the Cache-Control header on each object. For most static sites the managed CachingOptimized policy is a good start. It also enables gzip and Brotli compression, so text files are smaller on the wire.
The more important decision is what Cache-Control to put on each kind of file, because that decides how long visitors keep an old copy.
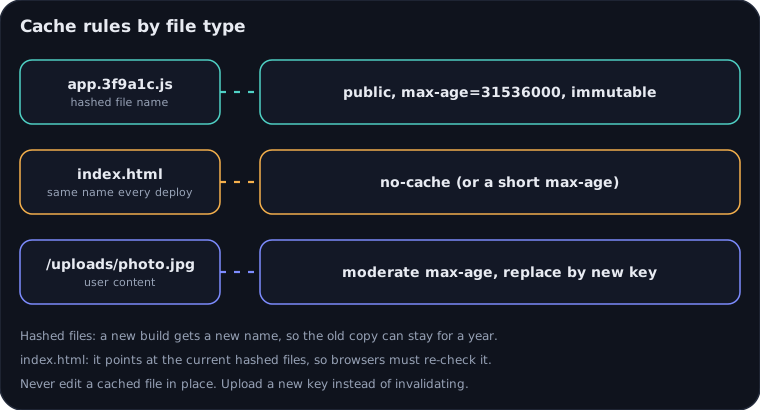
- Hashed files (
app.3f9a1c.js,style.8b2d.css): Vite, Next.js and most bundlers put a content hash in the file name. A new build gets a new name, so the old name can be cached for a year and markedimmutable. These files never need invalidating. index.html: the name stays the same on every deploy, and it is the file that points at the current hashed files. Mark itno-cache(the browser must re-check) or give it a very shortmax-age.- User uploads: a moderate
max-ageis fine, but never overwrite the same key with different content. Upload a new key and update your database, so no cache ever serves a stale copy.
The rule behind all three is simple: change the name instead of clearing the cache. A name that has never been seen before cannot be cached anywhere.
Set the header when you upload, as the next step shows.
Step 4: deploy without stale files
Here is a deploy workflow that follows those rules. It runs in CI, so nobody uploads files by hand.
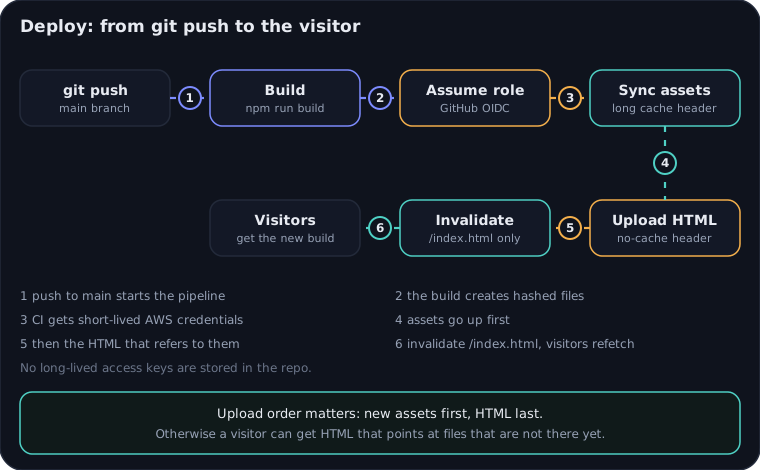
The order matters. Upload the new hashed assets first, then upload index.html last. If you upload the HTML first, a visitor can receive HTML that points at files that are not in the bucket yet.
A GitHub Actions job that does this looks like the following. It uses OIDC to get short-lived AWS credentials, so no access key is stored in the repository (the CI/CD post covers pipelines in more depth, and the secrets post explains why long-lived keys are a risk):
permissions:
  id-token: write
  contents: read

steps:
  - uses: actions/checkout@v4
  - run: npm ci && npm run build

  - uses: aws-actions/configure-aws-credentials@v4
    with:
      role-to-assume: arn:aws:iam::123456789012:role/deploy-site
      aws-region: ap-southeast-1

  # 1. hashed assets: cache for a year
  - run: >
      aws s3 sync dist s3://my-assets-bucket
      --exclude "index.html" --delete
      --cache-control "public,max-age=31536000,immutable"

  # 2. the HTML entry file last: always re-check
  - run: >
      aws s3 cp dist/index.html s3://my-assets-bucket/index.html
      --cache-control "no-cache"

  # 3. only the HTML needs invalidating
  - run: >
      aws cloudfront create-invalidation
      --distribution-id EDFDVBD6EXAMPLE --paths "/index.html"
The IAM role should be allowed only what the job needs: list and write on this bucket, and cloudfront:CreateInvalidation on this distribution. Trust it only for your repository and branch in the role's trust policy.
Because everything else is hashed, one invalidation path is enough. Invalidations beyond a monthly allowance are billed per path, so invalidating /* on every deploy is both unnecessary and a habit that adds up.
If your site is a single-page app, add a custom error response that returns /index.html with status 200 for 403 and 404 errors. A missing object in a private bucket returns 403, and without this rule a refresh on /dashboard shows an error. The trade-off is that real missing files also return the app shell, so keep your app's own "not found" screen.
If it is a static site with real folders (/about/index.html), a small CloudFront Function that rewrites /about to /about/index.html is the usual fix, because the default root object only applies to /.
Step 5: custom domain and HTTPS
To serve from cdn.example.com instead of d111111abcdef8.cloudfront.net:
- Request a certificate in AWS Certificate Manager in the
us-east-1region. CloudFront only uses certificates from that region, even when your bucket is somewhere else. This is a common reason the certificate does not show up in the dropdown. - Add the domain as an alternate domain name (CNAME) on the distribution and attach the certificate.
- In Route 53, create an alias A record (and AAAA for IPv6) that points to the distribution. An alias works at the root of a domain too, where a normal CNAME cannot.
CloudFront also lets you attach a response headers policy, so security headers such as Strict-Transport-Security and X-Content-Type-Options are added at the edge for every file.
Step 6: uploads from users
CloudFront is for reading. For uploads, do not open the bucket to the public. Let your API hand out a short-lived presigned URL, and let the browser upload straight to S3:
import { PutObjectCommand, S3Client } from '@aws-sdk/client-s3';
import { getSignedUrl } from '@aws-sdk/s3-request-presigner';

const s3 = new S3Client({ region: 'ap-southeast-1' });

export async function createUploadUrl(userId: string, contentType: string) {
  const key = `uploads/${userId}/${crypto.randomUUID()}`;

  const url = await getSignedUrl(
    s3,
    new PutObjectCommand({ Bucket: 'my-assets-bucket', Key: key, ContentType: contentType }),
    { expiresIn: 60 }, // seconds
  );

  return { url, key };
}
Your API checks that the user is allowed to upload, builds a random key, and returns the URL. The browser sends the file with an HTTP PUT, and your app saves the key. Because every upload has a fresh key, the caching problem from step 3 never appears. The bucket also needs a CORS rule that allows PUT from your site's origin.
Validate the content type and size on your side, and treat uploaded files as untrusted until you have checked them.
If some files must be private (invoices, paid videos), CloudFront supports signed URLs and signed cookies, so only users your API approves can fetch them through the CDN.
The whole picture
Here is everything together, so you can see how the pieces connect:
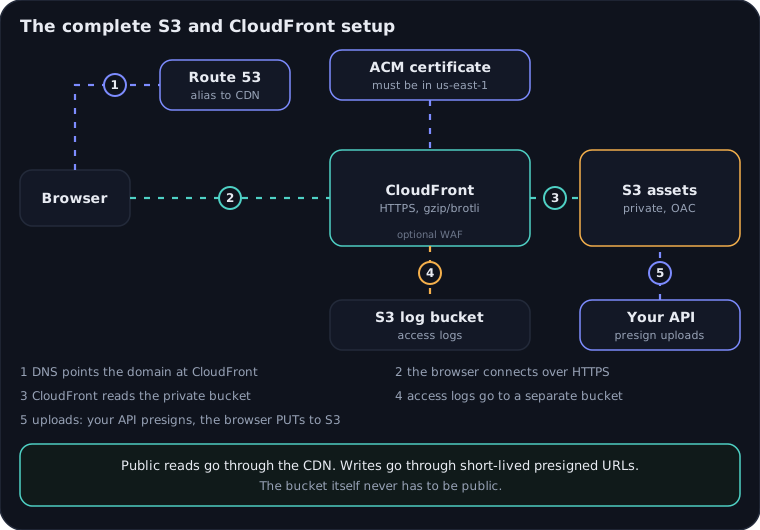
Reads go through the CDN, writes go through short-lived presigned URLs, and the bucket itself never has to be public.
Debugging: is it really coming from the cache?
When something looks stale or slow, check the response headers first:
curl -sI https://cdn.example.com/app.3f9a1c.js | grep -i -E "x-cache|age|cache-control"
X-Cache: Hit from cloudfrontmeans the edge answered from its cache.Miss from cloudfrontmeans it went to S3. A first request is usually a miss, and the second is usually a hit.Ageshows how many seconds the copy has been cached.Cache-Controlshows what your object told the cache to do.
The usual causes of "my change did not appear" are an index.html with a long max-age, an object overwritten in place under a cached name, or a browser's own cache. Fix the header first and invalidate second.
Common mistakes
- A public bucket. Keep Block Public Access on and use OAC.
- Long cache on
index.html. Users stay on the old version until the cache ends. - Invalidating
/*on every deploy. Use hashed file names and invalidate only the HTML. - Certificate in the wrong region. It must be in
us-east-1. - Overwriting uploads in place. Use a new key for every upload.
- Access keys in CI. Use OIDC and a narrow role.
- No logs. Turn on access logging to a separate bucket, so you can see hit rates and errors.
A short checklist
- Private bucket, Block Public Access on.
- CloudFront distribution with OAC and the generated bucket policy.
- HTTPS only, ACM certificate from
us-east-1, Route 53 alias. - Hashed assets with a one year
immutableheader, HTML withno-cache. - CI deploy: assets first, HTML last, invalidate only the HTML.
- Presigned URLs for uploads, signed URLs or cookies for private files.
- Logs on, and
X-Cachechecked after every change.
None of this is exotic. It is the same small set of decisions each time: keep the origin private, name files by their content, and let the cache do the work. Once it is set up, S3 plus CloudFront is one of the cheapest and most reliable ways to serve static files, and the pipeline stays small enough to understand at a glance.
Working on something like this?
I take on backend, payments and deployment projects. I reply within one working day.